XVID & VIDOMI GUIDE
(HOW TO MAKE A GREAT DIVX (yes, Divx) MOVIE FROM DVD
SOURCE)
THE ONLY AMBITION OF THIS GUIDE`S AUTHOR IS TO
HELP PEOPLE CONVERT THEIR HOME MADE (AMATEUR) DVD VIDEOS TO DIVX (MPEG4) FORMAT
(WHICH CONSUMES 4-8 TIMES LESS SPACE WHILE PRESERVING QUALITY) SO THEIR FRIENDS
AND RELATIVES (PROUD PC OWNERS) CAN ENJOY THOSE MASTERPIECES WITHOUT NEED FOR
PURCHASING A DVD PLAYER. ANYWAY THAT WAS THE MAIN IDEA OF PEOPLE WHO HAD
CREATED DIVX CODEC, WASN`T IT? ;-P
We shall perform this
excersise by using Vidomi and XviD codec. Some folks have problems using this
combination (bear in mind that this is free software) but I will show you how
to make, in just few steps, a perfect looking video.
I prefer Vidomi due to it`s
simplicity - easy installation, no crashing, no need for additional software
and resulting video looks excellent.
XviD is a great encoder.
Not so popular as DivX 3.xx/4.xx or 5.xx but has few major advantages -
quality, it`s free and develops rapidly. It`s only rival is DivX 5.xx
professional which you have to pay for.
Now, enough talking, let`s
work.
When you see *, **, etc. go
to the end of this article.
This guide deals with PAL
movie conversion. For NTSC look at Vidomi documentation: http://www.vidomi.com/
First, you have to
have your *.VOB files somewhere. These are the files containing your video. You
should copy them to your hard disc together with corresponding *.IFO file (they
share the similar name). There are many DVD rippers.
I prefer CladDVD
due to it`s simplicity and reliability. *
Install XviD
codec. You
can choose between two versions:
Koepi`s http://www.roeder.goe.net/~koepi/ (while I`m writing this,
10% faster than Nic`s)
Nic`s http://nic.dnsalias.com/
Install Vidomi. http://www.vidomi.com/
Open externalcodec.cfg
that is in Vidomi directory. Open it with Notepad or other text
editor.
Change offsets to:
xvidEncodeModeOffset=0
xvidBitrateOffset=4
xvidDesiredSizeOffset=8
xvidStatsfilenameOffset=12
This settings are
for XviD versions after 18th April 2002. Save the file.
Start Vidomi.
Click on "Mode".
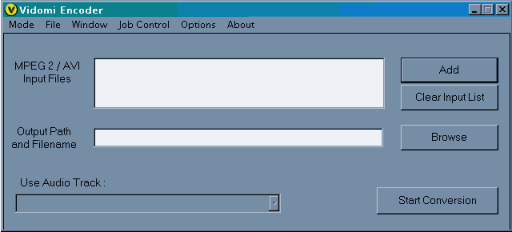
Vidomi Encoder
Click on
"Add" button. Select your *.IFO file (or your *.vob, *.m2v or *.avi
files).
Select output path
and your final movie filename.
Select your audio
track. (Usually the first one)
You can reset all
settings to default in "Options" --> General Options. While there,
uncheck "Enable Enhanced..." and "Check for New..." Set
"Output All Files With The Extension" to ".avi" (to make
your life less complicated).
Click on "Options"
--> Video Options.

Video Options
Set options as in
picture except for "Encode Color Space". YV12 is much faster.
These settings are
for 16:9 PAL movie. Height and width HAVE TO be devideable by 16!
For a 4:3 movie
use Crop: 16, 16, 16 ,16 and Height (pixels) 384. Check crop lines in
"Options"
--> Select
Source Range (you may have to increase your screen resolution to see the whole
window).
Resizing works
like this: First you crop movie edges to get rid of black frame and then you
strech
(you shouldn`t) or
shrink (you should), or otherwords, RESIZE to desired (devideable by 16) size.
"Video Codec
Settings"-->XVID VBR (Two Pass), Set XVID Codec Parameters-->
Encoding Mode:
2pass 2nd pass Int
Advanced
options--> Just as in picture below (correction: FourCC should be DivX so
your friends
could watch your
movie with their DivX codec installed - no need for them to install XviD codec
then).
Quantization tab
goes like this:
Min I-frame: 2
Max I-frame: 31
Min P-frame: 2
Max P-frame: 31
OK. All other
settings default.
Now to main window
"Options" --> Audio Options. Uncheck
"Process Audio" if you don`t wantto
use sound now. If
you do want sound in movie check it and adjust "Lame Min Bitrate" as
you wish
(according to size
of your ears :-)). 128 Kbps is average quality. For a stronger sound level
normalize it
in one or two passes. (RadLight player has a "dynamic amplify" filter
so it doesn`t need
normalised audio).
All other settings - leave as they are.
"Options"
--> Output Size Options. Check "Target Size by Media Disc Count", 1 Media
Disc.
Reserve 10
Mb of disc space for Overflow. Media disc size: depends on CD size.
640, 700 or more
Mb (overburning or
new, 99min CD media). Resulting file will be cca 10 Mb shorter than than
desired
media disc size so
you can increase it a little. This is necessary since defaulted 2 Mb for
overflow
can create two AVI
files insted of one.
These are the
settings for a 1CD movie. If you plan to do a 2CD movie just put double size in
"Media
Disc Size" field
(and split it in VirtualDub program at desired keyframe) or leave "Media
Disc Size"
with a single CD
size and choose 2 Media Discs (so Vidomi will cut it in half). That`s it.
If you do not want
to include sound in your movie (yet) reserve space for 192 Kbps audio (you can
add
AC-3 later, for
instance).
"Options"-->"Network
Options". Uncheck "Hyper
Encode". Just to be sure.
Now, turn off your
screen savers, Power Save off. Back to Vidomi`s main screen. Click on
"Start
Conversion"
button. If you wish Vidomi to turn off your PC as job is done, click
"Window"-->"Show
Conversion Control
Window" and check the thing.
Eat something, do
what you usually do before bedtime. Go to sleep. Wait until the sun is really
up.
Wake up ...
Your DivX (XviD)
movie is done.
*CladDVD ripper http://clonead.clb.net/ or
it´s cousin CladDVDxp (works under win98 too) is another
example of a simple but powerful software tool. You just press on «Select Movie», see where
your movie files are, go to «Advanced Select», select your
VOB files again plus an IFO file just «above» this VOBs. Start selected
operation and after 10 – 15 min you have your IFO and VOB files on hard disc (4
– 7 Gb).
Soon I will try to
put few XviD codec releases on this website.
Koke