AutoGK DivX/XviD Conversion Guide
Original Page URL: http://www.divx-digest.com/articles/autogk.html
Author/Publisher: Digital Digest
Date Added: Feb 16, 2006
Date Updated: Jul 10, 2005
AutoGK (Auto Gordian Knot) is a new tool aimed at beginners to DVD conversion. It uses a simple 3 step method to encode videos, and shares some of the same ideas as Gordian Knot, one of the more advanced tools for DVD conversion.
The goal of AutoGK is to provide a simple, 3 or 4 click method to convert a DVD to a DivX/XviD file.
Requirements :
 6-8 GB of free hard-disk space. 6-8 GB of free hard-disk space.
Software Downloads :
Summary of procedures :
- Step 1: Input and Output Directories - Setting up input and output directories;
- Step 2: Select Audio Track and Subtitle Track - Setting up audio and subtitles tracks;
- Step 3: Select Output Size - Setting the required output size of the encoded video;
- Optional : Step 4: Advanced Setup - Advanced Settings for AutoGK;
- Step 5: Start Encoding
AutoGK only accepts unprotected/unencrypted DVD files, either on the disc or (preferably, due to speed and efficiency) on your hard-drive.
Step 1 : Input and Output Directories
 AutoGK Step 1 : Input and Output Directories
- Start AutoGK (download the latest version here).
- In this section, we specify the input and output to AutoGK. The input would be the DVD files or an AVI/MPG file, and the output would be the name of the converted file. For the DVD files, you will notice that there will most likely be more than one .VOB file (eg. VTS_01_0.VOB, VTS_01_1.VOB, VTS_01_2.VOB ...) - to convert all of these files at the same time, simply load the corresponding .IFO file for these .VOB files (for example, VTS_01_0.IFO for all .VOB files name VTS_01_*.VOB).
- Now use the folder icon to select your input and output files.
- Additional information about the input is displayed when you load the input DVD/file.
Step 2: Select Audio Track and Subtitle Track
 AutoGK Step 2 : Select Audio Track and Subtitle Track
- AutoGK should now know enough about your input files to display a list of audio tracks on the current DVD/file. Select the audio track that you want to use in your converted DivX/XviD movie. If you want more than one audio track for your converted movie, you can select the second track here as well.
- Do the same for the subtitle track, if the original DVD had subtitles.
Step 3 : Select Output Size
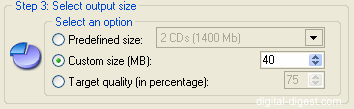 AutoGK Step 3 : Select Output Size
- We will now define the desired output size for the converted file. A "1 CD" movie will usually not look that great, whereas a "2 CD" movie will usually look pretty decent. You can also set a custom size, or define the file size as a quality value (percentage of original quality).
Step 4 (Optional): Advanced Setup and Hidden Options
 AutoGK Step 4 : Advanced Setup
- There are also some optional advanced settings that you can set. To access these advanced settings, press the "Advanced Settings" button. This should open a new window.
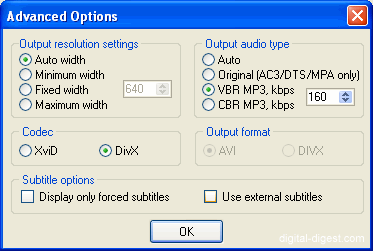 AutoGK : Advanced Options
- The Resolutions settings options determine the video resolution that AutoGK will use. Setting it to "Auto width" will let AutoGK determine what is the best resolution to use, given your current selected output file size - this is the best option to use. Selecting "Minimum width" or "Maximum width" allows you to specify the minimum or maximum width that AutoGK is allowed to use when encoding your video. The "Fixed width" option allows you to set a fixed width that forces AutoGK to use. Using a setting other than the "Auto width" setting may decrease quality if not used properly (remember that a high resolution + small output file size = bad quality).
- The Codec setting allows you to select either the DivX or XviD codec to use.
- The Audio options determine the audio encoding options AutoGK will use. The "Auto" option will use 128 kbps VBR (variable bit-rate) MP3 audio for 1 CD movies, keeping the original DVD AC3 audio (if available) for 2 CD or larger movies. Alternatively, you can force AutoGK to use AC3/DTS/MPA or VBR/CBR MP3. AC3 does not offer the best quality versus file size ratio, so using VBR MP3 at 128 kbps for 1 CD movies and 160 kbps for 2 CD movies is the recommended setting.
- Finally, the Subtitles options allow you to configure two settings related to the subtitles. The "Display only forced subtitles" option will make sure only forced subtitles (eg. those that are displayed even if you turned off subtitles on the DVD - typically for when a character speaks in a foreign language). The "Use external subtitles" option will tell AutoGK to use internal subtitles (subtitles selected will be burned onto the video, and hence, can't be turned off/removed at a later stage) or external subtitles where the subtitles is stored in a file and requires an external software to display the subtitles.
- Now press "OK" and close the "Advanced Options" window. Take note of the "Preview" button - this allows you to see a preview of what the final output will look like (complete with subtitles). Using this option is a good way to make sure you haven't made any mistakes prior to the actual encoding (which will take a long time, so there's a risk of time wasting if the settings aren't correct).
- There are also optional hidden settings you can configure for AutoGK - these are a bit advanced, so normally, you do not need to bother with these, but we'll go through them anyway:

- .mono - enable "Force encoding sound in mono" to force the audio to be encoded in mono as opposed to stereo
- .cartoon - enable "Force cartoon mode for XviD" to produce better XviD results for cartoon/anime
- .ivtc - force IVTC to occur for hybrid sources
- .deint - force deinterlacing to occur for hybrid sources
- .credits - this XviD only options allows you to set a different encoding standard for ending credits of movies (which require less bitrate/quality) than the actual movie. You can set which frame the credit starts (or use the Frame calculator to calculate when it starts), set a quality setting (lower = worse quality) or even encode in black and white.
- .autocrop - this option determines how AutoGK does auto cropping, or you can force a crop setting to be used.
- .aspect - you can specify your own aspect ratio, as opposed to using the same AR as the input
- .fps - you can change the framerate of the encoding, and specify the "Treshold for duplicate detection" which AutoGK will use to determine how to find and drop duplicate frames to reduce the framerate
- .sharpmatrix - check this option to tell AutoGK to use the MPEG quantization matrix for XviD encodings
- .kerneldeint - when deinterlacing is selected, you can enable this option to use the KernelDeInt filter and specify a threshold for it
- .itu - enable this option to force ITU resizing
- .debug - enable "Display VCF scripts for VDubMod in the logs" for more information when debugging a potential problem
- .adjustsub - enable "Resizes and places burnt-in subs properly" to ensure burnt-in subtitles are fully visible in the output
- .colorcorrection - enable to use the color correction filter
- .detect43 - enable this option to tell AutoGK to force a 4:3 aspect ratio if it detects the input has a similar, but not exact, ratio
- .compatibility - enable this and select an option to ensure compatibility with standalones that use MTK/Sigma/ESS chipsets
Step 5 : Start Encoding
- Now all that's left is to start the actual encoding, which will take a while (depending on how fast your computer is). Start the encoding by pressing the "Add Job" button to add the current encoding job to the job queue (which means you can actually encode several different files/DVDs one after the other, without you having to intervene - great for when you want to leave the computer on overnight to convert several DVDs). There is also a "Shutdown when done" option, which shutsdown your computer once all the jobs have been completed.
 AutoGK : Add Job
- Once your job(s) has been added to the job queue, press the "Start Encoding" button pictured above, sit back and relax while AutoGK does all the hard work.
 AutoGK : Start Encoding
|