


Page 1 of 1: AVI Audio Normalize/Increase Volume Guide
Because DVD audio has a greater dynamic range (ie. higher "highs" and lower "lows"), the resulting audio after conversion may not be loud enough on your average set of computer speakers. This is why we introduce the audio normalizing process ("evens" out the lows and highs and then increase overall volume), which can dramatically improve audio volume.There are many audio tools that can normalize the audio for you, including CoolEdit 2000, Normalizer and even the Creative WaveStudio program that comes bundled with SB-Live cards. In fact, most semi-advanced audio tools should have an audio normalization option. For this tutorial, there are 3 different methods :
-
METHOD 1 - Normalizes the audio - uses AVIUtl
METHOD 2 - Increase audio volume - uses VirtualDub
METHOD 3 - Normalize and/or increase audio volume - uses VirtualDub, Normalizer and the Pers-o-FrontEnd 4 Normalize or NormalizeGUI.
METHOD 1 :
- Start AVIUtl and load in your converted DivX file.
- From the "Filter" menu, select "Audio Normalization".
- From the "Settings" menu, select "Audio Normalization", and you can use the slider to change the level of normalization - if you don't know what to do, just leave the setting alone to use the default setting.
- From the "File" menu, select "Save AVI".
- Enable the "No Recompress" option to the right of the "Video Codec" button.
- Click on the "Audio codec" button to reselect the codec/properties you used earlier in FlasK MPEG to encode audio (eg. MPEG Layer-3).
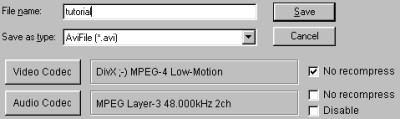
- Type in the file name of your DivX file (a different name than your original converted DivX file) and press "Save" to begin the process.
- After the process is complete, your Divx file should now have normalized audio, and generally should sound lounder.
- If after the process the audio is still not loud enough, you'll have to follow METHOD 3 below instead
METHOD 2 :
- Start VirtualDub and load in your converted DivX file.
- From the "Video" menu, select "Direct Stream Copy".
- From the "Audio" menu, select "Full Processing Mode".
- From the "Audio" menu, select "Volume", check the "Adjust volume of audio channels" option, and you can use the slider to change the level of audio.
- Press the "Preview Output" button and listen to the audio - if it isn't loud enough, go back to the previous step and increase the amplification level.

- From the "Audio" menu, select "Compression" and select "MPEG Layer-3" and the same or lower bitrate/attributes (eg. 128 kBit/s, 48000 Hz, Stereo) you used earlier to make the DivX movie.
- From the "File" menu, select "Save AVI" to save the AVI to include the normalized audio. This shouldn't take too long as only the audio is re-encoded/compressed - the video will be left alone.
METHOD 3 :
- The first thing we'll need to do is to extract the WAV file from the already converted DivX file :
- Start VirtualDub and load in your converted DivX file.
- From the "Audio" menu, select "Full Processing Mode".
- From the "Audio" menu, select "Compression" and select "No Compression (PCM)".
- From the "File" menu, select "Save WAV" to extract the audio from the DivX movie and save it as a PCM WAV file.
- The next thing you will need to do is to install and run Normalize to normalize the PCM WAV file :
- Download both Normalizer and Pers-o-FrontEnd 4 Normalize or NormalizeGUI and extract them to the same directory.
- Click on Pers-o-FE4N.exe to start the FrontEnd. The first time you run this program, it will ask you to locate where you extracted the Normalize program - please choose the right directory
- In the Input/Output section load your PCM WAV file and set your output file location (and make sure you check/enable the "-o
" option). Change the "Amplification" option to "-m " and leave the setting at 100.
- Press the "Go!" button to start the processing. This should start the normalization process the at the end of it, you should have a brand new WAV file with increased volume. Try to playback to WAV to see if the volume is loud enough. If it isn't, proceed to the next step, otherwise, skip the next step.
- If the volume is still low, start up Pers-o-FE4N again and load in your already normalized WAV file. This time, instead of using the "-m
" option in the "Amplification" section, use the "-a " section and change the setting to 10 or something (a higher setting will yield a larger amplification, hence lounder volume) - 10 should usually be enough. Press "Go!" again to start the processing and repeat this step until the volume is loud enough for you. - The last few steps involves putting the (normalized) WAV audio file into the DivX file using VirtualDub :
- Start VirtualDub and load in your converted DivX file.
- From the "Video" menu, select "Direct Stream Copy".
- From the "Audio" menu, select "Full Processing Mode".

- From the "Audio" menu, select "AVI Audio" and load in your normalized and/or amplified WAV file.
- From the "Audio" menu, select "Compression" and select "MPEG Layer-3" and the same or lower bitrate/attributes (eg. 128 kBit/s, 48000 Hz, Stereo) you used earlier to make the DivX movie (in FlasK MPEG).
- From the "File" menu, select "Save AVI" to save the AVI to include the normalized audio. This shouldn't take too long as only the audio is re-encoded/compressed - the video will be left alone.
Adding a WAV into a AVI/DivX using VirtualDub
