


Page 1 of 3: English Version
Select the "DivX Codec 4.x" (depending on your version of the DivX codec - eg. "DivX Codec 4.01") in the "Choose Videocompressor" window (note that you can select any codec you want here, if you don't want to convert to DivX). Press the "Configure" button, and you should see the window below. Further below is a brief explanation what each of these options mean for a more detailed explanation, please refer to Nicky Page's DivX4 Beta guide).
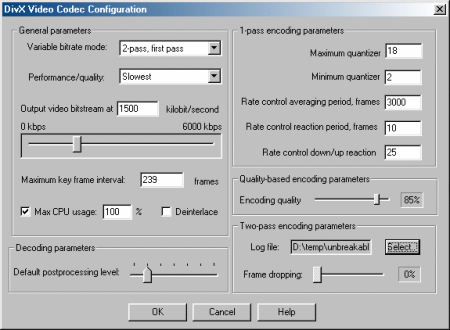
Description of Settings :
Variable bitrate ModeChoose the type of encoding method for this codec. "1-pass" encoding is similar to DivX 3.11 Alpha's "low motion" encoding. "1-pass quality based" encoding is basically constant bitrate encoding (same bitrate used for every frame), and is similar to the compression used in MPEG-1 movies (ie. crappy compression). "2-pass" is the best encoding option (for smallest file size, and best quality) - unfortunately, it takes twice the time of "1-pass" encoding, but the results may be worth it - 2-pass uses the bitrate you selected as appropriately as possible, to give you both an accurate file size (good if you are using bitrate calculators - make sure you get a DivX 4.x/5.x compatible calculator) and the best possible looking picture given that bitrate.Performance/Quality
For this tutorial, instructions for all 3 encoding methods will be given, but I strongly recommend "2-pass" encoding. For a more detailed explanation, please refer to Nicky Page's DivX4 Beta guide.Set this to "slowest" for the best possible quality, "fastest" for best speed (lowest quality).Output video bitstream at :This is the bit rate setting for the video. A setting of 1500 will produce very good quality video (lower will mean a smaller file size, but poorer quality). Don't go below 650 (650-1000 for 1 CD movies), and there is probably not too much point in going over 2000 (1300-2000 for 2 CDs).Maximum keyframe interval
You can use the various Bit-Rate Calculators to determine which bitrate suits you best - make sure you get a DivX 4.0 compatible calculator, as older calculators won't give you the correct value.Keyframes helps you to skip forward/backwards (seek) through the movie (when you skip, the picture has to land on a keyframe first). Keyframe are automatically inserted at scene changes, but in case you have a movie where the scene never changes, then set this to a reasonable value to avoid having no keyframes. For example, you can insert a keyframe every 10 seconds by multiplying the framerate of the movie (eg. 23.976 or 25 or 29.97) by 10 (eg. 240, 250, 300), and entering it here.MAX CPU UsageLeave this at 100% to ensure that up to 100% of your CPU is used during DivX playback (no frame skipping, if possible).DeinterlaceLeave this turned off, since the DivX codec 4.x's own deinterlacer's quality is not so good.Default Processing LevelKeep this set at a lower notch. For a more detailed explanation, please refer to Nicky Page's DivX4 Beta guide.1-pass encoding parameters :Below are very important settings in determining quality. For a more detailed explanation, and explanations on the settings not listed here (ie. those that don't need to be changed too much), please refer to Nicky Page's DivX4 Beta guide.Quality-based encoding parameters :
Maximum Quantizer - A higher setting (eg. 20) will mean a more compression, hence less picture quality. Lowering the value will increase the file size.
Minimum Quantizer - A lower setting (eg. 2) will mean a more clear picture (less blocky), but will increase the file size.
Rate control averaging period, frames - This setting determines how the bitrate should be averaged out (eg. if there was a spike in bitrate used in previous frames). Leaving this at 2000 seems to work fine, but experiment by increasing this value, may bring better quality.
Rate control reaction period, frames - This setting determines how fast the codec should react the scene changes. The default value seems to work fine.
Rate control down/up reaction - The default value also seems to work fine here.
Encoding quality - This option is only available when you select the "1-pass quality based" variable bitrate option. This setting is pretty self explanatory - the higher the percentage, the better the quality (although 1-pass quality based will have very poor quality compared to 2-pass encoding).Two-pass encoding parameters :
Log file - 2-pass encoding requires the information in the first pass to be stored in a LOG file - you can specify the location to store the log file by using this option.
Frame dropping - Tells the codec how much it should start dropping frames when the bitrate selected isn't enough - leave this at 0 for the smoothest possible picture. Of course, theoretically, if your selected bitrate is high enough, this setting won't matter.
