


Page 1 of 1: Creating a DVD2AVI Project
Notice: DVD2AVI is an outdate software. A new enhanced and improved version is available called DGMPGDec/DGIndex, and you can read the exact same guide using this new software here.
DVD2AVI project files is basically an AVI file that can "link" to a DVD VOB file, allowing software that doesn't support DVD VOB files, but support AVI files to open and manipulate them, including converting the DVD VOB files to DivX.You should download the following software, which are required for this article :
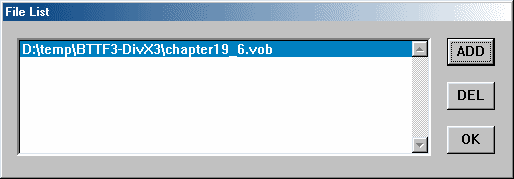
- Start DVD2AVI and from the "File" menu, select "Open" (or press the "F3" shortcut key). Load in your VOB files, and make sure they are in the correct order.
- We'll now need to playback a bit of the movie to find out a little bit about how the movie is made (unfortunately, there is no "automatic" way to do this yet). To start playback, press "F5".
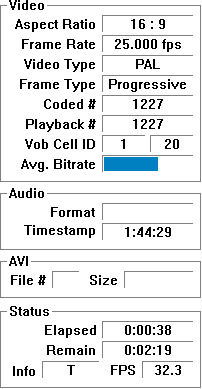
- When DVD2AVI plays back a file, look at the "Statistics Window" and observer the following stats :
- If the Frame Rate is 25.000 fps
Your movie is a PAL movie. Watch the movie for a little while, and if you notice any interlacing artifacts (see picture below), then you need to go to the "Video" menu -> "Field Operation" and change the "Swap Field Order" option (if it is selected, select the "None" options; if it is deselected, select it). Try playing the movie again ("F5") and hopefully the interlacing artifacts should be gone, or at least reduced.
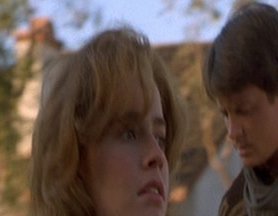
No Interlacing Artifacts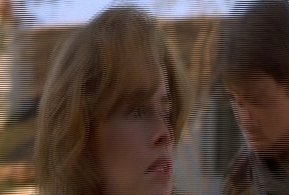
Interlacing Artifacts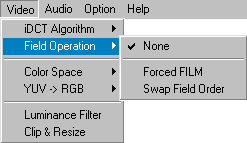
DVD2AVI - Video Options - If the Frame Rate is 29.970 fps
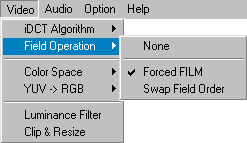
- If the Video Type is FILM for more than 90%
From the "Video" menu, select "Field Operation" -> "Forced FILM"
- If the Video Type is FILM for less than 90% or is NTSC
The movie was most likely taken from a TV source, and this require IVTC conversion. Select the "None" for the "Field Operation" setting, proceed on with this guide to save the DVD2AVI project file and then follow this guide to do the IVTC conversion. Don't follow this guide if you are using DVDtoOgm.
- If the Video Type is FILM for more than 90%
- If the Frame Rate is 25.000 fps
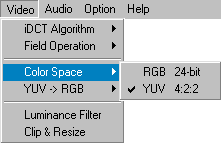
- Make sure the "Color Space" is left as YUV.
- Selecting the audio stream is selected for the project :
-
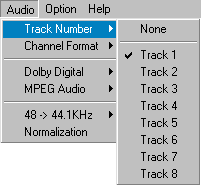
Go to the "Audio" menu and select the appropriate "Track Number". Alternatively, you can go into the "Dolby Digital" or "MPEG" menus and select "Demux All Tracks" to extract out all of the available audio tracks from the DVD VOB file.
- All we have to do now is the save the project, from the "File" menu, select "Save Project" (or press the "F4" shortcut key). You'll get a file called something like bttf3 AC3 T01 3_2ch 384Kbps DELAY -320ms.ac3, which basically tells you that this 3+2 channel AC3 file, which has a bit-rate of 384 with a delay of -320 ms.
- Start the VFAPI conversion tool. Click on the "Add file" button and load in your DVD2AVI project file (.d2fv). Press "OK" to close the window that opens and then press the "Convert" button to start the conversion. You should now have an VFAPI-AVI file that you can use with AVI capable applications.
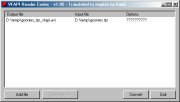
VFAPI conversion :
In case your program does not support DVD2AVI project files, you can use the VFAPI conversion tool to convert it to an AVI file (using the VFAPI codec). The following steps shows you how to convert the DVD2AVI project file to an VFAPI-AVI file, and therefore, is optional.
