

Page 1 of 1: DVD to PSP Conversion Guide
The PlayStation Portable (PSP) is a great little device, but one of the main problems is that it is difficult to playback your existing video on this device since it will not support the majority of video formats out there (AVI, MPG, DVDs). There is where PSP Video 9 comes into the equation. PSP Video 9 is a freeware video to PSP conversion tool, and using this tool, you will be able to convert your existing video to a format that the PSP can play. This guide covers converting a DVD movie for playback on the PSP.Changelog :
 Version 1.0 (10 August 2005) - First public version of the guide
Requirements :
6-8 GB of free hard-disk space
PSP with sufficient storage capacity
Software Downloads :
PSP Video 9 Apple QuickTime (optional - for testing playback of converted file on your PC)Summary of procedures :
Step 1 : PSP Video 9 Setup
- Start PSP Video 9. If this is the first time you've used PSP Video 9, you may get a screen that detects whether your PSP is connected or not. If your PSP is not connected, then you can skip this screen by selecting "Manually Specify PSP Directory".
- Click on the "Setup" button at the top of the screen. This should bring you to the PSP setup screen.

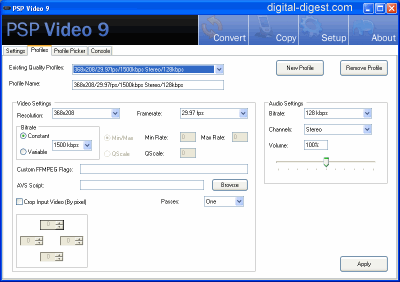
PSP Video 9 : Setup
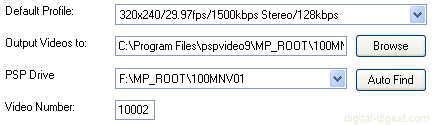
- The four main settings that we need to be concerned about are "Default Profile", "Output Video to", "PSP Drive" and "Video Numbers".
- Default Profile: This is possibly the most important option, as this determines the quality and file size of final video. The profiles are listed in the following format:
Video Resolution/Framerate/Video Bitrate {Stereo or Mono}/Audio Bitrate
For the video bitrate, there are two types of profiles - one that says somethings like "1500kbps" and another that says something like "QB4". The first one uses a constant bitrate (not as good quality, but easier to predict the final file size), and the other uses variable bitrate. With constant bitrates, the higher the value the better the quality (and larger the file size). With variable bitrate, the lower number indicated, the better the quality (eg. QB4 is better than QB 10).
The following table shows you the output size for some of the selected profiles, which you can use as a rough guide to select the right profile for you:
Original Clip Properties:
Format: DVD VOB Length: 1 minute 50 seconds Size: 91.2 MBSelected Profile: Output Size: 320x240/15fps/216kbps Mono/48kbps 4.07 MB 320x240/29.97fps/QB4 Stereo/96kbps 6.10 MB 320x240/29.97fps/1500kbps Stereo/128kbps 11.6 MB
Note that you can create your own profile, and also see the exact properties of any existing profile by going into the "Profiles" section of setup.
PSP Video 9 : Setup - Profiles
- Output Video to: This is the directory where the output video will be saved to. You can navigate to this directory and copy the movie file manually to your PSP (if you do not use the Copy function in PSP Video 9 to perform the same action).
- PSP Drive: This is the location if your PSP drive, which is used to store your output video if you use PSP Video 9's copy function.
- Video Numbers: In order for PSP video files to be playable, they must be named a certain way. The format of the naming is:
MV4*****.mp4
The ***** represents a 5 digit number. PSP Video 9 will automatically increment the number listed in this setup option for you when it creates a new video file. You can manually change it here in case you already have video files using these numbers or if you want to reset the number back to a lower number.
 PSP Video 9 Setup
Step 2 : Convert movie
- Now that the hard work has been done, it's time for PSP Video 9 to do it's work and convert the movie to PSP video format. This step will take the longest, but won't require any user interaction.
- Click on the "Convert" button at the top of the screen. This should bring you to the PSP conversion screen.

PSP Video 9 : Convert
- Click on the "Convert New Video" button and navigate to the directory that contains your DVD files, and select the VOB file (usually named VTS_0X_1.VOB, where X is a number) and press "Open"

PSP Video 9 : Convert New Video
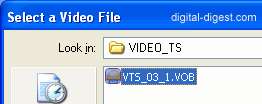
PSP Video 9 : Select VOB file
- Once you press "Open", the video/audio conversion process will start. All you have to do now is wait for the DVD to be converted.
- You can also click on the "New Job" to add more videos to convert to the queue.
 PSP Video 9 Convert
Step 3 : Testing Playback/Copying to PSP
- The converted video will now be located in the "Output Videos to" directory specified in Step 1: PSP Video 9 Setup above. You can navigate to this directory, and you should see two files created for each video (a .MP4 and a .THM thumbnail) file. If you have QuickTime installed, you can open the MP4 file and play it back to test its quality.
- If you are happy with the converted DVD, you can now copy the file to your PSP. There are two ways to do this - one within PSP Video 9, and also manually. With either method, you have to ensure your PSP is connected to your computer using the USB connection.
- Copy within PSP Video 9: Click on the "Copy" button at the top of the screen. This should bring you to the PSP Video 9 copy section.

PSP Video 9 : Copy
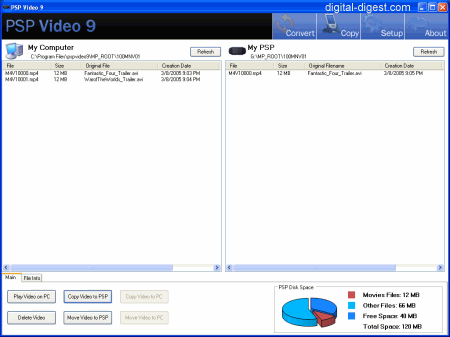
PSP Video 9 : Copy
Here, you can select a file and click on the "Copy Video to PSP" to copy the video file to your PSP.
- Manual Copy: If you don't want to use the copy facility within PSP Video 9, you can copy your video files manually to your PSP. First, navigate to your PSP's storage drive (eg. F). Create a directory called "MP_ROOT" if it does not exist - go into this directory and create a sub-directory called "100MNV01" (that's 3 zeroes) if it does not exist. You should now have a directory structure similar to:
F:\MP_ROOT\100MNV01
Now copy your MP4/THM files that PSP Video 9 created to the above directory.
- And that's it folks. Nice and simple.
