In this section, we specify the input and output to AutoGK. The input would be the DVD files or an AVI/MPG file, and the output would be the name of the converted file. For the DVD files, you will notice that there will most likely be more than one .VOB file (eg. VTS_01_0.VOB, VTS_01_1.VOB, VTS_01_2.VOB ...) - to convert all of these files at the same time, simply load the corresponding .IFO file for these .VOB files (for example, VTS_01_0.IFO for all .VOB files name VTS_01_*.VOB).
Now use the folder icon to select your input and output files.
Additional information about the input is displayed when you load the input DVD/file.
Step 2: Select Audio Track and Subtitle Track
AutoGK Step 2 : Select Audio Track and Subtitle Track
AutoGK should now know enough about your input files to display a list of audio tracks on the current DVD/file. Select the audio track that you want to use in your converted DivX/XviD movie. If you want more than one audio track for your converted movie, you can select the second track here as well.
Do the same for the subtitle track, if the original DVD had subtitles.
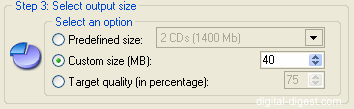
Step 3 : Select Output Size
AutoGK Step 3 : Select Output Size
We will now define the desired output size for the converted file. A "1 CD" movie will usually not look that great, whereas a "2 CD" movie will usually look pretty decent. You can also set a custom size, or define the file size as a quality value (percentage of original quality).

 AutoGK Step 1 : Input and Output Directories