Page 1 of 3: English Version
Introduction
Cutting AVI files is actually quite an easy thing to do, if you know which software to use. Although there are many generic file cutting tools available, the problem with them is that they don't "understand" the AVI format, and the files that are cut with them will most likely have problems.However, using an AVI editing tool to cut AVIs, will almost always yield good results. There are many AVI editors around, but for this tutorial, we'll use VirtualDub, a freeware open-source AVI editor, popular amongst the DivX community.
What VirtualDub does isn't strictly cutting, but what it does is allow you to select a part of the movie, save it as another AVI file (no re-compression needed, so it will only take a few seconds to save the AVI file), and repeat this process until all your AVI cut is completed.
We hope you enjoy this guide.
Required Software
You'll need to download and install the following software before you proceed with the rest of this guide.Instructions
- Start VirtualDub and load in your AVI file (from the "File" menu).
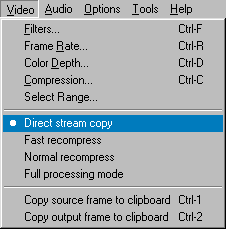
- From the "Video" menu, select "Direct Stream Copy".
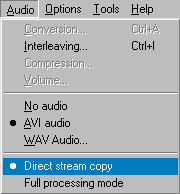
- From the "Audio" menu, select "Direct Stream Copy".
- Let's also get familiar with VirtualDub's controls
- Slider - Can be used to slide to parts of the movie
- Move to last frame - Pressing this button will move the slider to the end of the movie
- Keyframe previous - Skip to the previous keyframe
- Keyframe next - Skip to the next keyframe
- Mark in - Marks a position that tells VirtualDub where to start the cut
- Mark out - Marks a position that tells VirtualDub where to end the cut
- Current Slider position - Tells you where the slider is currently positioned at
- First, press the Move to last frame button to move the slider to the end of the movie. Take a note of the Current Slider position, especially the Frame number. This is the total number of frames. Example : total number of frames is 2387
- Decide how many parts you want to cut the movie, and divide the total number of frames by the number of parts you want to cut - this is the number of frames for each part. Example : number of parts you want to cut is 4. If total number of frames is 2387, then each part will be 596 frames.
- Slide the slider back to the beginning of the movie.
- Press the Mark in button.
- Slide the slider to where you want to stop cutting. Example : move the slider to frame 596 x 1 = 596 (or roughly there).
- Press the Keyframe previous or Keyframe next button once to skip to the next keyframe (it is good to cut at a keyframe, to avoid problems).
- Now press the Mark out button. Note that part of the slider bar will now have been highlighted - the highlighted part is the part you are cutting.
- From the "File" menu, select "Save as AVI" and save the file as a new AVI (don't overwrite your existing files). Example : save the AVI as movie-1.avi
- Press the Mark in button.
- Slide the slider to where you want to stop cutting. Example : move the slider to 596 x 2 = 1192 (or roughly there).
- Press the Keyframe previous or Keyframe next button once to skip to the next keyframe (it is good to cut at a keyframe, to avoid problems).
- Now press the Mark out button. Note that part of the slider bar will now have been highlighted - the highlighted part is the part you are cutting.
- From the "File" menu, select "Save as AVI" and save the file as a new AVI (don't overwrite your existing files). Example : save the AVI as movie-2.avi
- Repeat step 13 through 17 until you are near the end of the movie - if you are near the end of the movie, press the Move to last frame button to cut the last part of the movie.
- Please note that you should have several new AVI files, but your original AVI file should still be there (you can delete it if you don't need it anymore).


Fixing Audio Synch
The primary reason for audio synch problems is that audio interleaving option in VirtualDub's "Audio" menu. You should uncheck the "Enable audio/video interleaving" option and make sure the audio track delay setting is at 0. Also, it is wise to cut on keyframes to avoid similar audio problems.


