


Page 1 of 1: Digital TV to AVI Conversion Guide
Digital TV capture cards are now available on the market, and you can now capture high definition streams onto your PC. Unfortunately, these streams tend to be huge in size. Naturally, a highly compressive format like DivX would be a great format to convert these streams into.Unfortunately, the usual format that DTV capture cards record to (.ts - transport stream) aren't really supported by many applications, and hence, it makes DTV conversion difficult.
This guide will try to provide instructions on how to convert DTV .TS files to AVI, using freely available tools. This guide assumes a certain degree of knowledge in the area of DivX encoding and DVD conversion, as it will not cover extensive instructions on the details of DivX encoding (however, you will be referred to existing guides that already cover these topics). While there are numerous methods that can be used for conversion, this guide will only cover the most basic method (using VirtualDub) and hopefully, it will give you just enough information to know how to use other methods, if you wish.
P.S : If you wish to download some .TS clips, try this link
Requirements :
 .TS (Transport Stream) source file; Basic knowledge about video compression using the codec of your choice; High resolution (1280 x 960) Windows desktop, for working with high resolution streams.
Software Downloads :
Summary of procedures :
- Using HDTVtoMPEG2 - Converting the HDTV stream to MPEG-2 format;
- DVD2AVI Project Creation - Using DVD2AVI to create a project file;
- VFAPI Conversion - Convert the DVD2AVI project to an frame-served AVI file;
- Video Conversion using VirtualDub - Process and encode the frame-served AVI file in VirtualDub;
- Audio Conversion using BeSweet - Convert the audio using BeSweet;
- Multiplexing in NanDub - Joining the converted video and audio files in NanDub.
Step 1 : Using HDTVtoMPEG2
- First up, we'll convert our .TS (transport stream) to a MPEG-2 VOB file using HDTVtoMPEG2.
- Start HDTVtoMPEG2. Press the "Add" button and load in your .TS file(s).
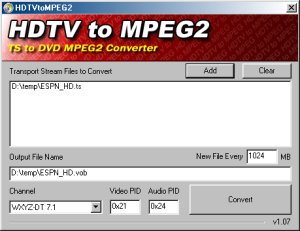
HDTVtoMPEG2
- If, for whatever reason, you want to split the output file into smaller files of a specific file size, then enter a new file size (in MB) in the "New File Every" option box.

HDTVtoMPEG2 - New File Every ... MB
- Now specify an output file name and location. If you want to split the output file using the "New File Every ... MB" option above, please make sure the file name you choose here has the "0000" (four zeros) characters at the end of the file name (eg. Terminator_30000.mpg). Note that you can also use .vob extensions as opposed to .mpg
HDTVtoMPEG2 - Choosing an output file name/location
- Some DTV streams have channel information stored in the files. The Channel information contains the video and audio PIDs, which are required by the HDTVtoMPEG2 program. However, if your TS file does not have this information, then you'll have to manually enter the video and audio PIDs into HDTVtoMPEG2.
The common video and audio PIDs are 0x11 (video) and 0x14 (audio). Ocassionaly, they may be 0x21 (video) and 0x24 (audio). The first digit in the PID is usually your digital program's program ID and the second digit specify the type of stream ('1' for video '4' for audio). Trial and error may be need to determine the right PIDs for your .TS files, and so it is recommended you try different sets of PIDs on a small .TS file until you have found the right PIDs.

HDTVtoMPEG2 - Channel/Video/Audio PIDs
- Now all you have to do is the press the big "Convert" button, and your .TS stream will have been converted to a .mpg/.vob file. Please try playing back this output file (WinDVD is recommended for playing back .TS/MPG/VOB files).

HDTVtoMPEG2 - Start conversion
Step 2 : DVD2AVI Project Creation
- We'll now create a DVD2AVI project file that will allow us to use the converted VOB file in our AVI conversion software, VirtualDub.
- Start DVD2AVI and from the "File" menu, select "Open" (or press the "F3" shortcut key). Load in your converted VOB files and make sure they are in the correct order if you have multiple files.
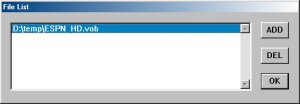
DVD2AVI - File List
- We'll now need to playback a bit of the movie to find out a little bit about how the movie is made (unfortunately, there is no "automatic" way to do this yet). To start playback, press "F5".
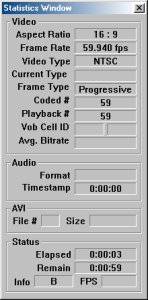
DVD2AVI - Statistics Window
As you can see, the clip I have loaded is a 59.94 FPS NTSC stream. This will come in useful for the optional frame-rate processing in VirtualDub (see below).
- All we have to do now is the save the project, from the "File" menu, select "Save Project" (or press the "F4" shortcut key). You'll get a file called something like espn AC3 T01 3_2ch 384Kbps DELAY -51ms.ac3, which basically tells you that this 3+2 channel AC3 file, which has a bit-rate of 384 with a delay of -51 ms.
The above instructions are edited excerpts from our Creating a DVD2AVI Project File guide - please refer to this guide for more detailed instructions on DVD2AVI project creation.
Step 3 : VFAPI Conversion
- We'll now convert the DVD2AVI project file to a frame-served AVI file that we can open and convert in VirtualDub. Frameserving refers to creating a "dummy" AVI file that "points" to your VOB file, and allows your AVI compatible program (VirtualDub in our case) to manipulate (including convert) the VOB file.
- Start the VFAPI conversion tool (make sure you have installed it properly, by following the instructions in the readme file, or more specifically, running the vifpset.bat file).
- Click on the "Add file" button and load in your DVD2AVI project file (.d2v). Press "OK" to close the window that opens and then press the "Convert" button to start the conversion. You should now have an frame-served AVI file that you can use with AVI capable applications (like VirtualDub, which is our next step). You can actually playback this frame-served AVI file (eg. in Windows Media Player) to make sure the frameserving has worked.
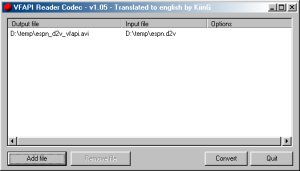
VFAPI Reader Codec Conversion
Step 4 : Video Conversion using VirtualDub
- We'll now convert the video (in the form of the frame-served AVI file) to a "real" AVI file. Here, we'll also crop and resize the video (optional) and apply a video compression codec (eg. DivX) to minimize the file size.
- Start VirtualDub and load in the frame-served AVI file you created in the previous step.
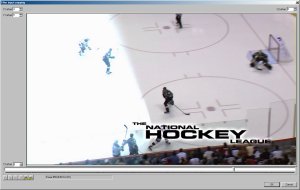
- As you may notice, the input video preview panel will probably show a very large preview of the input movie, due to the possible high resolution of DTV streams (eg. 1280x720). You can decrease the size of this preview by right clicking on the preview area, and selecting one of the sizes (eg. 1/4 size). The same can be done with the output video preview panel.

VirtualDub - Preview panel size
- From the "Video" menu, select the "Full Processing Mode" option. From the "Audio" menu, select the "No audio" option.
- The following step is optional, but highly recommended if you have a high definition clip (eg. 1280x720). In this step, we'll be resizing and cropping the video.
- From the "Video" menu, select the "Filters" option (or press the "CTRL-F" short-cut key). In the new "Filters" window that opens, press the "Add" button. This should open a new window with a list of available video filters to use. Find the "resize" filter and press the "OK" button.
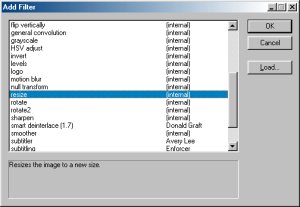
VirtualDub - Add Filters
- This should now open the "resize" filter configuration window. In this window, you can specify the output size of the video. The clip I used for this tutorial was 1280x720 in size, and so I wanted to resize this to a more reasonable 640x360 (half of original width/height). You might want to use a aspect ratio/resize calculator to work out the width/height of the resized video and also to main the proper aspect ratio (the ratio between width and height).
You should also change the "Filter mode" to "Precise Bilinear", since this will give the best quality when sizing down the video.
Press the "OK" button to continue.
VirtualDub - Resize
- You should now be returned to the filter selection window. Now click on the "Cropping" button - cropping removes the black border around the video. This is where a high resolution display really helps, since you may not be able to see the whole screen if you are using lower resolution setting.
Now use the slider to skip to a bright part of the movie (so that we are able to see the black border around the video, if any exists). Then, you can drag the border around the video window until the black area disappears. Make sure you do this to all four sides of the video. Also, some videos may have different sized black borders at different parts of the video - make sure you don't accidentally crop out part of the movie. When you are finished, press the "OK" button and your cropping settings will be saved.
Press "OK" again to close down the filter selection window. The output preview panel should now show the resized/cropped version of the video (use the slider to skip around a bit if you don't see the output preview, and also ensure the proper size for the preview panel is selected - see step 3 above).
VirtualDub - Cropping
- From the "Video" menu, select the "Filters" option (or press the "CTRL-F" short-cut key). In the new "Filters" window that opens, press the "Add" button. This should open a new window with a list of available video filters to use. Find the "resize" filter and press the "OK" button.
- The following step is also optional, but highly recommended if you have a NTSC clip with a high FPS (eg. 1280x720 @ 59.943 FPS). In this step, we'll be reducing the framerate of the video.
- The clip I used for this guide is a HDTV NTSC clip (1280x720 @ 59.94s FPS). The high FPS may mean choppy playback for the DivX codec, and so I will reduce the frame-rate by half (29.97 FPS) using VirtualDub's frame-rate decimation feature.
- Go to the "Video" menu, and select the "Frame Rate" option. A new window should open with some frame-rate options. The current frame-rate will be displayed at the top (see "red" rectangle in the screenshot below). Then select one of the "Frame rate decimation" options. In my case, I have selected "Process every other frame (decimated by 2)", which tells VirtualDub to only encode every other frame, hence reducing the number of frames by half. Press "OK" to continue.
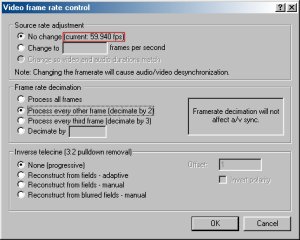
VirtualDub - Framerate
- The clip I used for this guide is a HDTV NTSC clip (1280x720 @ 59.94s FPS). The high FPS may mean choppy playback for the DivX codec, and so I will reduce the frame-rate by half (29.97 FPS) using VirtualDub's frame-rate decimation feature.
- The next step is to select the video compression codec. You can do this by selecting the "Compression" option from the "Video" menu. This guide will not cover the precise instructions on video codec setup, since it depends on which codec you select. However, the following guides may be of help :
- When you have finished setting up your codec, you can save the AVI file using the "Save as AVI" option from the "File" menu.
Step 5 : Audio Conversion using BeSweet
- After you have finished creating the DVD2AVI project file, you should get two files : a D2V project file and an AC3 audio file. We have already dealt with the D2V file in using the VFAPI reader codec and VirtualDub. The following steps detail how to convert the AC3 file to a format that can be read by NanDub for use in the next step. We're going to convert the AC3 file to a VBR MP3 file, since this will give us the best quality versus file size ratio.
- The filename of the AC3 file that DVD2AVI outputs will tell you a lot about the AC3 file. For example, the file I got was named "espn AC3 T01 3_2ch 384Kbps DELAY -51ms.ac3". What this means is that this AC3 file has 5.1 channels of audio, encoded at 384 Kbps and has a delay of -51 ms. Some of these facts will become important when we do BeSweet encoding, so please don't rename this file without writing down these values.
- Start the BeSweet GUI program (included in BeSweet package). Click on the "Azid 1" button to go to the Azid setup section.
BeSweet - Azid 1
- "Azid 1" section :
- For the "Azid 1" section, you only need to change two values. The first is "LFE To LR Channels", which sets how the sub-woofer channel is downmixed into the Left and Right channels.
If your AC3 file has "3_2ch" of audio (as specified in the filename), it is a 5.1 channel file and you'll need to set the "LFE To LR Channels" value to to "-3". We do this because as we want to make the LFE a little less loud and not take over the LR channels completely during big explosions, for example.
If your AC3 file only has "2_0ch" of audio, then there is no need to set this value (un-check this setting)
Azid 1 - Downmix
- The other setting you need to change is the "Dynamic Compression" option. Dynamic compression reduces the audio's dynamic range, evening out highs and lows and generally improving audio volume. Set this to "light" or "normal".
Azid 1 - Overall Output
- For the "Azid 1" section, you only need to change two values. The first is "LFE To LR Channels", which sets how the sub-woofer channel is downmixed into the Left and Right channels.
- Click on the "Lame 1" button to go to the Lame 1 setup section.
BeSweet - 2Lame
- "Lame 1" section :
- Change "Mode" to "Stereo" or "Joint Stereo" (joint stereo will save space, at the cost of a very very small loss of quality). Also change "Alt Preset" to "abr" (average bit-rate) and choose a bit-rate (eg. "160"). We'll be encoding the audio as a variable bit-rate MP3, hence the need to select an "average" bit-rate.
Lame 1 - Operational Options
- Change "Mode" to "Stereo" or "Joint Stereo" (joint stereo will save space, at the cost of a very very small loss of quality). Also change "Alt Preset" to "abr" (average bit-rate) and choose a bit-rate (eg. "160"). We'll be encoding the audio as a variable bit-rate MP3, hence the need to select an "average" bit-rate.
- Click on the "BeSweet" button to go to the BeSweet setup section.
BeSweet Setup
- "BeSweet" section :
- You need to first set the locations of BeSweet, the input and output files.

BeSweet - Locations
- The rest of the options can be set as follows :
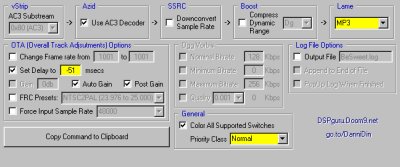
BeSweet - Configurations
Use AC3 Decoder - selected
Downconvert Sample Rate - de-selected
Lame - set to "MP3"
Set Delay to - set to the "ms" that your DVD2AVI created AC3 file's filename indicates (eg. our file has -51 ms in the filename)
Auto Gain - selected
- You need to first set the locations of BeSweet, the input and output files.
- Click on the "AC3 to MP3" button to start the encoding process. An MS-DOS command prompt window will be opened and the progress of the conversion will be displayed there.

BeSweet - Start Conversion
Step 6 : Multiplexing in NanDub
- Start NanDub. Load in your converted AVI video file.
- From the "Video" menu, select the "Direct Stream Copy" option.
NanDub - Video : Direct Stream Copy
- From the "Audio" menu, select the "VBR (MP3) audio" option and load in your converted MP3 audio file.
NanDub - Audio : VBR (MP3) audio
- Finally, from the "File" menu, select the "Save as AVI" option and choose a location/filename to save your final AVI file. Deselect the "Add operation to job list and defer processing" option to start the save immediately (also feel free to add some AVI tags to the AVI file here). And that's it - we now have an AVI file converted from our original DTV source, which should be much smaller in file size but still with reasonable quality!!
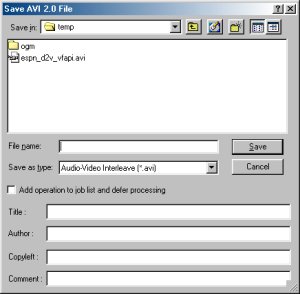
NanDub - Save as AVI
