Page 2 of 3: Using Nandub - Splitting/Cutting AVI Files
Now you have two methods you can use to set the ending point for the first avi. You can set it manually by which frame you want it to end at (easy method) or you can set it automatically by what size you want it to be (easier method).
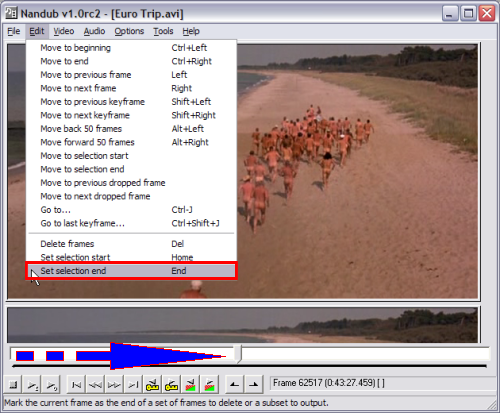
Manually by frame: After step 2, hold down the shift key and drag the slider to where you want the first avi to end (blue and red arrow). After that click "Edit", then "Set selection end" (red box). (might take a couple of tries to get the perfect frame) (Screen Shot Below)
or
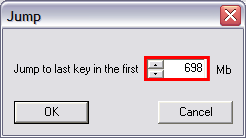
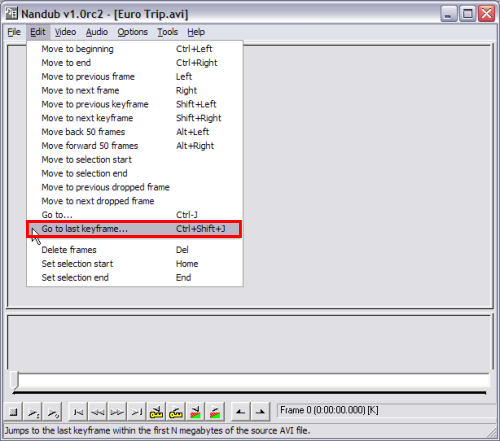
Automatically by size: After step 2, click "Edit" then "Go to last keyframe...", this window will pop up. Here you would enter in the final output size you desire (the size of the CD your burning it to, minus about 2MB). If you want the avi file to be under 700MB, put "698" or "699" in that box (red). The reason for the minus 2 MB is cause Nandub cuts by "keyframes", so the next possible key frame after "698" or "699" might be 1 MB to big for the destination media). After pressing "OK", it will bring you back to the main Nandub screen. Now click "Edit" at the top and click "Set selection end". Now press "F7" to save the first avi. (Screen Shot Below)
Manually by frame: After step 2, hold down the shift key and drag the slider to where you want the first avi to end (blue and red arrow). After that click "Edit", then "Set selection end" (red box). (might take a couple of tries to get the perfect frame) (Screen Shot Below)
or
Automatically by size: After step 2, click "Edit" then "Go to last keyframe...", this window will pop up. Here you would enter in the final output size you desire (the size of the CD your burning it to, minus about 2MB). If you want the avi file to be under 700MB, put "698" or "699" in that box (red). The reason for the minus 2 MB is cause Nandub cuts by "keyframes", so the next possible key frame after "698" or "699" might be 1 MB to big for the destination media). After pressing "OK", it will bring you back to the main Nandub screen. Now click "Edit" at the top and click "Set selection end". Now press "F7" to save the first avi. (Screen Shot Below)
